Tuesday, November 10, 2015

Edit Panasonic Lumix DMC-GH4R 4K MOV videos to Youtube/Vimeo

“I'm wondering if anyone out there has experience with the 4K footage the Panasonic Lumix DMC-GH4R produces and how it works with YouTube or Vimeo. If so, do you have any suggested export settings to get the most resolution out of the footage - without having to buy a new server farm. Does YouTube support the footage natively, or does it have to be converted first?”

In the trend of 4K video, even the sharing site, YouTube, offers 4K support. But, although YouTube official claims that it supports 4K, many people find it is not easy to upload Panasonic Lumix DMC-GH4R 4K video to YouTube. it’ll take an awful long time, and something even worse, it won’t show 4K option for you, but only 1080p sometimes. So what happened? 

I found there are some possible matters may impede you to add Panasonic Lumix DMC-GH4R 4K video to YouTube successfully. First, the GoPro output 4K MOV format is not an ideal format for YouTube. Then, the 4K high resolution from Panasonic Lumix DMC-GH4R is not supported well by YouTube. As far as I know YouTube now can only support 1080p, 720p video perfectly. What else’s, if you haven’t had a YouTube account yet, you can only upload videos less than 15 minutes; or YouTube won’t accept it. 

Hot SearchWatch YouTube Videos on VLC | Watch YouTube Videos on TV | Watch YouTube Videos on Roku

Although there are numbered tools and utilities can convert and compress Panasonic Lumix DMC-GH4R 4K videos, few of them can process at a fast speed. Featured with the most advanced converting technology, Pavtube Video Converter is now providing the most reliable and professional 4K solutions to all format issues including 4K XAVCXAVC S4K MP44K MTS4K MXFand more. And in built-in editing tool, you can trim video footage to get a 15 min 4K video clip for YouTube. You are also allowed to adjust video size, codec, frame rate and audio sample rate, bitrate to be more compatible with YouTube.(Review)


Other Download:
- Pavtube old official address: http://www.pavtube.com/video_converter/
- Amazon Download: http://download.cnet.com/Pavtube-Video-Converter/3000-2194_4-75734821.html
- Cnet Download: http://download.cnet.com/Pavtube-Video-Converter/3000-2194_4-75734821.html


Other Download:
- Pavtube old official address: http://www.pavtube.com/video-converter-mac/
- Amazon Store Download: http://www.amazon.com/Pavtube-Video-Converter-Mac-Download/dp/B00QIBK0TQ
- Cnet Download: http://download.cnet.com/Pavtube-Video-Converter/3000-2194_4-76179460.html

How to upload Panasonic Lumix DMC-GH4R 4K video to YouTube/Vimeo?

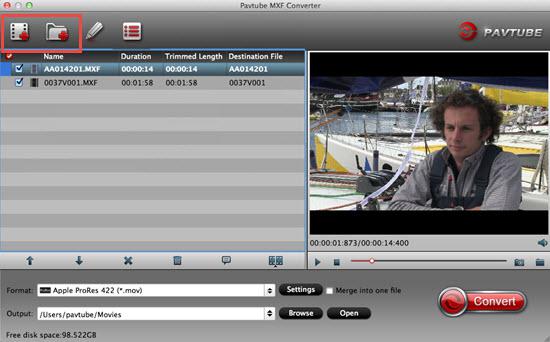
Step 1: Download and have a quick installation. The trial version will have a watermark on your converted files. Except for that, there are no time limitation, no virus, and no unnecessary bundle apps while downloading. After that, click “Add Video” button to load your original videos. You can load several files at once thanks to “Add from folder” button.


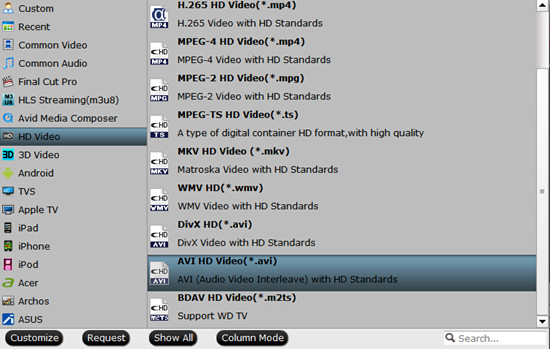
Step 2: Here, you need to choose what you want the output to be. Click “Format” drop-down list, and then select “HD Video>>AVI HD Video (*.avi)” as the best output format.


Step 3: You can also press the “Settings” button to adjust the video size, bitrate, frame rate, audio sample rate, etc to optimize the quality. As far as I know, YouTube's maximum 4K bitrate is 45Mbps and it doesn't work with 60fps 4K video well. You can set the video frame rate like 24fps. And keep in mind, YouTube always recompress the uploaded video, so upload the best, highest resolution you can.

Step 4: When everything is done, you can take a preview by hitting “Play” button. If you are satisfied with the final result, you can click “Convert” button to finish the conversion work.

Conclusion: Once the conversion process is complete, you can click “Open Folder” button to get the generated files for uploading Panasonic Lumix DMC-GH4R 4K video to YouTube/Vimeo with optimum performance.

Pavtube iMedia Converter for Mac: An all-inclusive converter to complete 2D/3D Blu-ray, DVD, ISO, SD/HD/4K Video to m3u8, H.265 MP4, do H.265 to non-H.265 conversion on Mac OS X El Capitan.

Read More:

Friday, November 6, 2015

Solve Premiere Elements 13 crash issue when loading Sony 4K XAVC videos

Summary: Fall in trouble when editing Sony 4K XAVC videos in Premiere Elements 13? If so, follow the easy workaround here.

Adobe Premiere Elements with stunning features is popular video editing software for us. The point here, sometimes, you will find it’s a painful experience when loading Sony 4K XAVC files into Premiere Elements 13. And there are some frequently asked question quoted as below.

Q1: Does Premiere Elements 13 Support 4K video?

Somehow my previous question disappeared. Does this program support 4K to burn to 4K Blu Rays?

Q2: Premiere Elements 13 crash


I’ve tried to get some 4K XAVC footage from an F55 to work in Premiere Elements 13. It imports, but when I try to do anything with it, it crashes.

As far as I know, Premiere Elements 13 has project presets for the video with the resolution of 3840 x 2160 (a 4K resolution) under NTSC only. It also offers export of the 3840 x 2160 resolution under Publish+Share/Computer/XAVC-S. However, there is no burn to Blu-ray with any 4K resolution. The compatibility between 4K videos and Adobe Premiere Elements is still an unsolved mystery in that some persons can import 4K videos into Elements, while the others can not:

On the one hand, the computer configuration and operation environment should play an important role on this aspect. On the other hand, bypassing 4K issue, XAVC, as a newly high compressed video format, is not supported by most NLEs, including Elements, FCP, iMovie .etc. So to get rid of the issue, the first step we need to do is to make 4K XAVC files editable in Premiere Elements 13.

Here we suggest you give a go with Pavtube XAVC Converter for Mac or Win which work smoothly in converting Sony 4K XAVC to a more “edit” friendly codec for Premiere Elements 13 like MPEG-2/AVC MOV. The most attractive thing is that it can downscale your 4K videos into common 1080p so that NLEs can afford well. If you're troubled by the similar problem, just download the right version and follow the guide below to start conversion.

Before processing:

Back up/Transfer the 4K XAVC footage to Mac computer - copy the whole video folder to your computer hard drive, not just the individual .xavc files.

Step 1. Install Launch the Mac XAVC to PE Converter. Click "Add Video" and browse to Sony XAVC clips and the software will add it to file list. Repeat the operation to load multiple XAVC videos. Or you may click the "Add Folder" button to import all the XAVC files in the file structure.


Step 2. Click on "Format" and choose "MPEG-2 (*.mpg)" or "MOV(AVC) (.mov)" from " Adobe Premiere/Sony Vegas> " as the best codec for editing Sony 4K XAVC in Premiere Elements 13. What's more, you can also transcode XAVC toFCP for editing or to QuickTime and iPad Air for playback.


Step 3. Click on "Settings" to redefine output quality. You can also set a different video resolution (1920x1080/1440x1080/1280x720/720x480), frame rate (24p/30p), bitrate, audio channels, etc. For users who would like to retain exactly the same settings (without any quality loss), set target settings the same to source video.

Step 4. Click "Convert" to start transcode 4K XAVC to MPEG-2/MOV for Premiere Elements 13 editing on Mac/PC. Once you get the converted .MOV/.MPG file, you can import it to Premiere Elements 13

Now you can edit your Sony 4K XAVC videos in Premiere Elements 13 with ease.

Monday, November 2, 2015

Open and edit Sony PMW-300K1 XDCAM footage in FCP X

Summary: Have trouble importing Sony PMW-300K1 XDCAM files into FCP X for further editing? If so, follow the quick-start guide to learn how to prepare XDCAM for editing in Final Cut Pro X without quality loss.

Sony's new PMW-300K1 XDCAM camcorder is the first semi-shoulder mount camcorder to combine the benefits of 1/2-inch type Exmor? Full HD 3CMOS sensor technology with 50Mbps HD recording at MPEG HD422, meeting broadcast standards around the world.

If your footage is on an SxS Card, you will be able to import Sony XAVC, XDCAM, XDCAM HD, and XDCAM EX media into Final Cut Pro X, after you have downloaded and installed the XAVC/XDCAM Plug-in for Apple (PDZK-LT2) provided by Sony, then you are off and running and can import into FCP X just as you would with your other footage. Beware, the plugin does not support optical media.

When using Sony Plug-jin for Apple, and edit Sony PMW-300K1 XDCAM media with FCP X, you may still meet some problems. This could happen because of the different codec in a number of XDCAM files as FCP X might not support all of these codecs. And it would be difficult for you to finish the complex procedure. Then just consider an easier and more effective way to solve get all Sony PMW-300K1 XDCAM video and FCP X to work nicely.

The quick workaround is to convert Sony PMW-300K1 XDCAM to FCP supported Prores .mov (the most compatible video format for FCP X) file format and then transfer the converted mov videos to FCP X for editing.

Software you need:

Pavtube HD Video Converter for Mac is the best choice, this video app can deal nearly all kinds hd videos, it can change Sony PMW-300K1 XDCAM Full HD 1920 x 1080 files into a native Prores .mov format for FCP X on Mac. Just to experiment Pavtube HD Video Converter for Mac to convert the XDCAM to Proes 422 and surprisingly it works perfectly in FCP X.

Solution to importing Sony PMW-300K1 XDCAM video to FCP X

Step 1: Run XDCAM to FCP Converter for Mac and you can import PMW-300K video clips to the program through "Add Video" button or "Add from folder" button.


2. Click "Format" bar to determine output format. For natively editing in FCP, you are recommended to choose "Final Cut Pro > Apple ProRes 422 (*.mov)", this format is best for Final Cut Pro X editing.


Tip:

There are other four presets for ProRes: Apple ProRes 422 HQ, Apple ProRes 422 LT, Apple ProRes 422 Proxy and Apple ProRes 4444. Usually the ProRes 422 HQ has better video quality than ProRes 422 and could meet your needs. If you need smaller size, turn to ProRes 422 LT.

Learn more Apple ProRes, please refer to Types of Apple ProRes Codecs

3. If you would like to customize the video and audio parameters, you can click "settings", adjust the parameters as you want, like Video Codec, aspect ratio, bit rate, frame rate, Audio codec, sampling rate, bit rate, channels.


4. Click "Convert" to start to convert Sony PMW-300K1 XDCAM video to Apple Prores codec for native editing in FCP X.

When the XDCAM to FCP X conversion task is finished, click "Open" button to get the exported files for transferring to Final Cut Pro X with easy editing.

Additional Tips:

This powerful XDCAM Converter for Mac not only can help you convert XDCAM footage to FCP X, but also enables anyone with XDCAM files to use in any non-linear editor like Adobe Premiere Pro, iMovie, FCE, Avid Media Composer, etc as long as transcode your Sony XDCAM footage to a recognizable format.

Read More:

Tuesday, October 27, 2015

Playing Recorded Halloween Party Videos on Mac/Windows Computer

Summary: This could worsen the boredom but the good news is that you can convert the videos to a supported format on your mac or windows player. Below is the smooth guide.

When you attend Halloween party, you could be that person who never misses to record the events so that you can watch them later or share them with your friends who never attended. In whichever reason that you recorded the events of the party, you can now decide to play them on your Mac on a boring afternoon but fail to play. This could worsen the boredom but the good news is that you can convert the videos to a supported format on your mac then play them.

What you need is media converter tool that can quickly and accurately convert your videos, a powerful tool calledPavtube Video Converter for Mac or Pavtube Video Converter ?( Windows version). Just ensure that you download the right version for your computer. It converts audios and videos of different formats to various formats without hassle. The supported audio formats include MP3, WAV, AU, MKA, OCG, M4A, AIFF, APE and M4R. Whereas the Video formats include, MP4, MOV, MKV, AVI, MOD, TOD, VOB, WMV, HD FLV and many more.


Other Download:
- Pavtube old official address: http://www.pavtube.com/video-converter-mac/
- Amazon Store Download: http://www.amazon.com/Pavtube-Video-Converter-Mac-Download/dp/B00QIBK0TQ
- Cnet Download: http://download.cnet.com/Pavtube-Video-Converter/3000-2194_4-76179460.html


Other Download:
- Pavtube old official address: http://www.pavtube.com/video_converter/
- Amazon Download: http://download.cnet.com/Pavtube-Video-Converter/3000-2194_4-75734821.html
- Cnet Download: http://download.cnet.com/Pavtube-Video-Converter/3000-2194_4-75734821.html

How to Playing Recorded Halloween Party Videos on Mac/Windows Computer

Step 1: Import Halloween video footage.

Launch the app on your computer, click the "Add Video" or "Add folder" icon to import Halloween video to the program.


Step 2: Set output file format.

From "Format" bar drop-down list, choose the output format according to your own needs. For example, you can choose "Final Cut Pro" > "Apple Prores 422(*.mov)" as your desired output format for editing with FCP or FCP X.


Step 3: Start conversion.
Hit right-bottom "Convert" button, the conversion will start automatically with a progress bar.

Hot News: Happy Halloween and Hurry up!!! Pavtube's 2015 Halloweenn Promotion is on the road (Offer Valid from Oct. 23, 2015 to Nov. 6, 2015). This Time Pavtube offers up to 40% Off discount on its featured software apps. Never miss this chance to get what you need.

Read More:

Monday, October 26, 2015

Pavtube 2015 Halloween Special Offer - Up to 40% Discount


Festivals are always the best opportunities to purchase the goods you were not willing to buy or had no ability to afford in the past days. 2015 Halloween is coming. Are you ready to open your wallet? To make your Halloween celebration even greater, Pavtube Studio has prepared a great Halloween Promotion – we are offering you a generous 40% Discount on our Blu-ray & DVD Softwares (Windows 10 and El Capitan supported). 


Since Pavtube Studio offers many kinds of Blu-ray/DVD/Video softwares that you possibly don't know which one to choose, I can make a brief introduction and a recommendation to you. 

Recommendation 1: If you often do video conversion process, you can take Pavtube Video Converter Ultimate and Pavtube iMedia Converter for Mac into consideration. It can accept any Halloween movie source, like Blu-ray/DVD disc and 4K/SD/HD online/local video in any format and transform them to nearly any popular video format you have ever seen. 


Recommendation 2: For those who have plenty of Blu-ray discs, Pavtube BDMagic and Pavtube BDMagic for Mac will be the best choice. They are cheaper than the recommendation one but supply the same effect on Blu-ray/DVD Halloween movies. 


Recommendation 3: DVD owners who just need to rip and backup DVD disc or copy DVD folder, DVD ISO/IFO can focus on Pavtube DVDAid and Pavtube DVDAid for Mac. It only can deal with DVD movies but it is the cheapest item. 


Recommendation 4: Pavtube ByteCopy and Pavtube ByteCopy for Mac are for situation that your Halloween Blu-ray/DVD movies have several subtitles and audio tracks and you want to keep all the tracks and chapter markerswhile ripping and copying the discs. What's more, it enables you to extract FLAC/WAV audio from Blu-ray audio disc and extract SRT subtitle from Blu-ray movies. 


Think about which one is the best choice for you so that you can solve your video conversion problem with the least money. Don't waste the money-saving chance on Halloween. Just do it!

Thursday, October 22, 2015

Review of Top 5 HD Video Converter for Mac OS X El Capitan

How to Convert Videos on Mac OS X El Capitan?
After upgrading to the new Mac operating system El Capitan, many users complain that their long-term use media entertainment conversion tool often get crashed on this enhanced new operating system. Don’t be panic though, the following article will pick 5 best HD Video Converter for Mac that rivals its competitors with stable and excellent performance on Mac El Capitan.

#Pavtube HD Video Converter for Mac


Pavtube HD Video Converter for Mac OS X (including El Capitan) can deal with all SD, HD, 2K and even 4K footage in various different formats (MTS, MXF, XAVC/XAVC S, H.265 are supported) generated by Sony, Canon, Nikon, Panasonic and JVC camcorder. With this professional editing codec maker, you will get no problem by outputting AIC/Prores/DNxHD for iMovie, FCP, FCE, Avid Studio, Adobe Premiere Pro, etc smooth post production workflow or uploading to video sharing sites like YouTube, Vimeo, Facebook, etc. 

#Handbrake


As a freeMac video converter that is quick in converting and comes with a bit rate calculator, Handbrake helps alter video quality in order to adjust the video size to your desire. It provides many options which will enable you to convert numerous files in various sizes without any compromise in quality. However, you can only convert MP4 and MKV formats on Mac OS X 10.11 and decodes videos to be played on devices such as iPhone, iPod and iPad. Handbrake is a rather disappointing video converting software when it comes to use on Mac El Capitan for video converting. 

#MPEG Streamclip Video Converter for Mac


The MPEG Streamclip Video Converter for Mac features with great technical abilities and swift converting speed thanks to the advanced technology it uses. This video converter can deal with majority of video files including MOV, MP4, WMV AVI, and 3GP, etc for viewing on your Mac OS X El Capitan. After you convert video files, you can enjoy them on your Mac computer or Apple device as well as some Android devices. It is free to download. Although it is very effective in video conversion, however, it has a very complicated interface that’s not so convenient to operate.

#Pavtube Video Converter for Mac


With Pavtube Video Converter for Mac (support El Capitan), you will have no limitation to transfer and play SD videos like AVI, WMV, MP4, MPG, FLV, VOB, etc, camcorder recordings like MTS, MXF, XAVC S, MP4, etc, Tivo and even audio files on various multimedia devices such as Apple/Android/Windows devices, media players, game consoles, HD/UHD TV, 3D virtual reality devices, etc.

Moreover, Pavtube Video Converter for Mac also allows you to customize ouput profile settings to get your desired and better output quality. Movie creation with this program is no big deal with the built-in editing functions: trimming, cropping, attaching external subtitles, adding watermarks, change video effect, etc.

#Pavtube iMedia Converter for Mac


Pavtube iMedia Converter for Mac OS X (El Capitan included) is the all in one toolkit that compromises Mac Video Converter, Mac Blu-ray Ripper and Mac DVD Ripper. With its powerful and comprehensive function, you can convert between virtual any file formats, copy 2D/3D Blu-ray and standard DVD with original structure or main movie without extracts, convert Blu-ray/DVD collection to various different video and audio formats for iPhone, iPad, Apple TV, Android, Windows Phones, PSP, PS3, and other devices playback.

As for 3D movie viewing, the program enables you to create 3D movies from 2D
Blu-ray/DVD with abundant 3D effects: Side by Side, Anaglyph, Top/Bottom. 3D Blu-ray disc can also be transformed to 3D MKV/AVI/WMV format for viewing on 3D TV, players, virtual reality devices and projectors.

Tuesday, October 20, 2015

How to Stream and Play Canon/Sony/Panasonic MXF Files on Roku 4 Mac El Capitan

The Roku 4 has arrived with powerful streaming, stunning resolution and incredible features as below:
4K support and features to highlight 4K video
More 4K channels at launch than competitors
Clean, easy-to-use interface and simple remote with buttons for favorite channels like Netflix
Faster than older Roku models
Lots of content: 300,000 movies and TV episodes; over 3K channels
Can now plug in a stereo or sound bar
New reset button and Remote Finder
Supports nearly all major video services (e.g. Netflix, Amazon Prime Instant Video, Google Play, Hulu, etc.). Not involved in anti-competitive measures as it’s an independent third party.

Besides watching videos or movies with built-in apps, Roku 4 also gives users the possibility of streaming local media files from external connected USB cable for watching on it. However, you can not throw every video to it since Roku 4 has its own limited playable formats:
Video: MP4 (H.264), MKV (H.264), HEVC (H.265)
Audio: MP3, Apple Lossless, WMA, AAC

From above lists, we can see that Mac users won’t be able to stream Sony XDCAM/Canon XF/Panasonic P2 camcorder recorded MXF files and also many other popular file formats to Roku 4. As a matter of fact, what you need is a Mac MXF Converter application, for Mac users who have just upgraded to Mac OS X El Capitan, you will have no problem to transcode Sony/Canon/Panasonic MXF files to Roku 4 playable formats on El Capitan with Pavtube upgraded MXF Converter for Mac(Top 5 MXF Converter for Mac)

Besides that, you can also utilize our application to decode MXF files for streaming on other media stream box such as Apple TV 4, Amazon Fire TV 2, Nvidia Shield TV, etc.


Other Download:
- Pavtube old official address: http://www.pavtube.com/mxf-converter-mac/
- AppStore Download: https://itunes.apple.com/us/app/pavtube-mxf-converter/id502807634?mt=12
- Amazon Download: http://www.amazon.com/Pavtube-MXF-Converter-Mac-Download/dp/B00QID8K28
- Cnet Download: http://download.cnet.com/Pavtube-MXF-Converter/3000-2194_4-76177789.html

How to stream and play camcorder MXF files on Roku 4 Mac OS X El Capitan?

Step 1: Import Sony/Canon/Panasonic MXF files.

Start up the program on your computer, import MXF files by clicking "File" > "Load Video/Audio" or "Load from Folder" to the program.


Step 2: Define output file format.
Go to "Format" drop-down bar, select Roku 4 playable format from "HD Video" > "H.264 HD Video(*.mp4) ".


Step 3: Start MXF file to Roku 4 conversion process.
Press the right-bottom "Convert" button to carry out the conversion process. When the conversion is completed, you will get no problem to transfer and stream MXF files to Roku 4.

Further Reading:
Copy/Put Tivo to NAS Device for Playing through Roku or WD TV Live Streaming Media Player
How to Play 4K Blu-ray on PC?
Can I play 4K H.265 files through Plex onto Roku 3?
Roku 3 Not Playing Blu-Ray Rips?
Stream DVD to Roku 3 through Plex Media Server
How to digitize iTunes movie to Plex for Roku 3